DIY

How to make Acai Bowls at Home

Moving to LA was the best thing I’ve ever done in my life. I get asked a lot by my Midwest friends, “What is the best thing about living in LA?” There’s no way to answer because the list would be 10 miles long. One overwhelming positive thing about living here is the abundance of healthy food and the overall celebration of healthy lifestyles. Coming from St. Louis & Chicago, where late night bars and 5AM pizza places were on every corner, Los Angeles is much more focused on a healthy active life for it’s residents. There’s free hiking all over the city, a groupon deal every day for new places to burn fat and an overwhelming growth of healthy “restaurants” such as Sunlife Organics, Beaming and The Harvest Bar to name a few.

While these places are popular stops for smoothies and organic cold pressed juices, my favorite thing to order is the Acai Bowl. It’s probably the healthiest thing I’ve ever eaten and you can feel the energy your body produces as you digest it. The downside is that these cost anywhere from $10-$15 a piece. Fed up with my $80/mo acai addiction, I went to Whole Foods this week and bought the ingredients to start making them myself. Trust me you guys- this is the easiest, most delicious healthy treat you can imagine! The best part is all of these health restaurants post their menu online so all you need to do is duplicate the ingredients.

The benefits of acai (not to mention the other ingredients) are plentiful! I’ve noticed a big change in my skin as well as hair growth. According to Global Healing Center, acai also has the following benefits:

Heart Health

Resistance to Harmful Organisms

Weight Loss

Skin Health

Helps with Digestive Issues

Helps with Respiratory System

Improves Cellular Health

Fights Cancer

Anti-Aging Effect (fights free radical damage from inside out)

Energy Boost

Better Sex!

Improves Mental Function

IMG_5954

So let’s get started! Here’s my personal shopping list, but feel free to adjust according to your taste

Bullet Blender (best buy ever!)

Organic Strawberries (frozen)

Organic Blueberries (frozen)

Fresh Fruit: Bananas*, Strawberries, Blackberries whatever your favorites are.

Acai Powder

Almond Milk (or Cashew/Hemp/Coconut/Soy)

Fresh Peanut Butter (or Almond/Cashew/Coconut Butter)

Toppings:

Chia Seeds

Cacao Nibs

Dried Coconut Flakes (unsweetened)

Hemp Seeds

Pumpkin Seeds

Bee Pollen

Raw Honey

Granola

I don’t use all of these ingredients in one bowl, but this gives you plenty of options to keep it exciting. The only thing you need to buy fresh is whatever fruit you want to put on top, the rest stays good for a long time.

Step 1:

Blend handful of frozen strawberries, handful frozen blueberries and half of a fresh banana (save the other half) with acai powder (1 TBSP), nut butter (1 TBSP) and 1/4C almond milk (or milk of choice). Sometimes I’ll throw 1/2 TBSP of chia seeds in the blender. (Because I HATE blenders, I actually use a bullet which works perfectly for 1-2 portions.) You want the mix to be consistent to sorbet so start with less vegan milk and add little bits more if you need to get to right consistency.

Step 2:

Add blended fruit mix to bowl. Slice up fruit and arrange around the top. I love fresh strawberries and blueberries on top. Top with 1/2 TBSP each of Hemp Seeds, Pumpkin Seeds, Cacao Nibs. Add granola if you’re extra hungry. Top with a swirl of Fresh honey (optional) and indulge!

UPDATE: more acai I’ve made this week:

10982276_10206574545417739_4367763391840321712_n

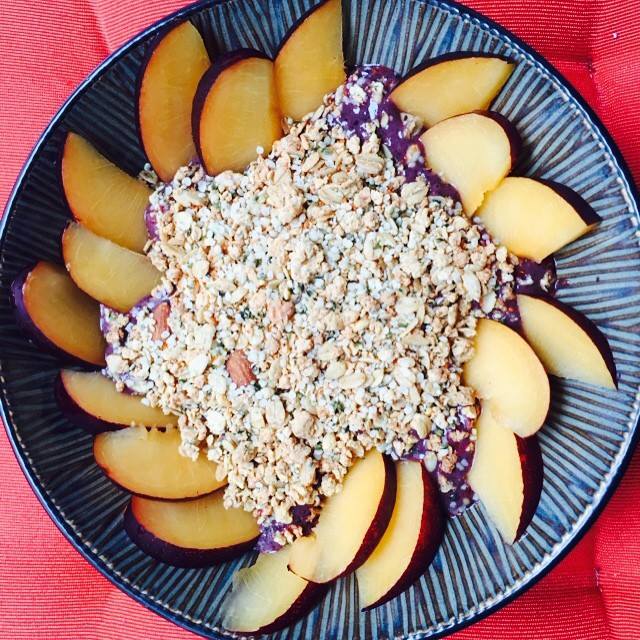
Base: frozen blueberries, banana, #acaipowder, almond milk. Top: #granola#hemp#plums, topped with #TAJIN.

11750646_10206567807409293_3569823929828638593_n

Base: (all #organic) frozen strawberries, fresh banana, acai powder, cashews, almond milk. Toppings: #granola, banana, strawberries, #hemp seeds, pumpkin seeds, #cacao nibs, blackberries

Some other recipes:

Ultimate Acai Bowl from Beaming

6 Different Acai Bowl Idea’s from SunLife Organics

As I’m typing this I just found this “Backyard Bowls” website and am about to freak out with excitement… 

Namaste!

Personalize your Brushes

When I started carrying my brushes to sites I realized quickly that they would need some sort of identifying mark. As a MAC artist I chose nail lacquer in a sparkly silver color that was unique to me. I carefully dotted the bottoms of all my brushes so that they could be easily identified when working with a group of artists who were all using so many of the same brushes. It worked out just fine but I was pretty indifferent to it.

Fast forward to the present where I work as a Tarte educator and artist and I have theses gorgeous bamboo handled brushes. I was inspired by all the beautiful patterns and decorative colors on the Tarte bags and products and I wanted to personalize my sets with something a bit more exciting. I found this fabulous Duck Tape brand tape from Target. I wrapped the handles of each of my sets differently to keep them cute, organized, and easily identifiable in events and trainings! I hope you like this trick. I included the amazon link so you can peek at the tape I used in the photo plus the other fun patterns polka dots, stripes, all different sizes even.

Cheers XO
KellyK

zig zag decorative tape

New Contributors to BeautyStyled means more info and more experts!

I wanted to take a moment to share that I’m going to be changing up this blog for the better. Working full time and running a business full time on the side is so much work that it’s hard to find extra time to write for you guys. I have met and continue to meet so many people that inspire me and challenge me in new ways that I want to share them with you! I have a close group of people that are similar to me in the sense that they are professionals and experts in their craft whether it’s skincare, makeup or hair. I have invited them to share their knowledge on beautystyled.com and they couldn’t be more excited!

Lauren Clark is a Celebrity Hair Stylist from Beverly Hills (and my personal hair stylist). She was one of the first connections I made here in LA and is the only person I trust to touch my hair from now on. We have worked on many projects already and she has so much knowledge about hair and health that she is excited to share.
megan dugan lauren clark pins and ponytails mdmamakeup

Dena Thurston is one of my best friends and a Regional makeup artist for Trish McEvoy. She has brought so much joy to my life not only as a friend but a partner in business as well. She is from Minnesota but is currently living in St. Louis. She is a stellar makeup artist and her organic recipes and lifestyle tips are just as fab as her skills behind a makeup brush.
megan dugan dena thurston makeup artists trish mcevoy

Kelly Kossakoski is one of my oldest friends in the biz. She has worked for many different brands and is currently one of the top people at TARTE Cosmetics. We met when I worked for MAC over 6 years ago. She sees life in a way that I am envious of. She finds beauty in everything and is one of the most inspirational and motivating people I know.

megan dugan kelly kossakoski makeup artists tarte trish mcevoy

These people are my dearest friends and colleagues and while I am very private with my personal life and friendships, I feel it’s best to share these people and their knowledge with you. We all have one goal in mind and that’s to make the world a more healthy and beautiful place, one post at a time 🙂

XX Megan

The Best DIY Body Scrub, Ever

Every once in a while I come up with an idea that makes me wish I had my own product line. Then after googling realize I’m not the amazing genius I hoped to be as it’s been done a trillion times already. Oh well. At least my recipe for the best body scrub (seriously) ever will save you some serious $$.

For you coffee drinkers, start saving your grounds. I keep a ziploc next to my coffee machine and every morning add my used grounds to it. (By the way, those of you with keurigs- I just bought this genius little refillable k-cup and started buying my own coffee and I’m saving so much money!)

Yet another reason to love Organic Coconut Oil… scoop about 2-3 tablespoons and add to 10 TBSP of coffee grounds. Those measurements are totally guesses. Add only enough coconut oil to hold the coffee grounds together and form a thick paste. Think cookie dough, not cake batter. Add to a sealable container and voila you have the best body scrub you’ve ever used. I can’t say it’s the BEST face scrub because I’m partial to ExfolikatePhilosophy Microdelivery Peel and Arcona Cranberry Gommage, but it’s right up there with them.

This is awesome because the grounds (you want to be using very fine grounds, especially on the face) gently slough away dead skin cells, the caffeine helps rid cellulite and wakes your skin up and the coconut oil leaves a shield of hydration.

When using this the water will be very brown so be sure to use a regular body wash afterwards.

I also like to use on the face as a mask for 5 minutes.

Happy Scrubbing! 🙂

For a cute idea, paint some mason jars and keep your scrub in that. Cuter than a bag of what appears to be black tar laying in your shower (awkward to explain to guests, trust me).

XX MDMA


What the heck am I doing teaching hair?!

Hell has frozen over everyone. I, Megan Dugan, queen of the original sock-bun has a hair tutorial. I learned this style from my new hair guru Lauren Clark, a stylist at Robert Vetica salon located in the SLS Hotel in Beverly Hills, CA. I have always thought the best red carpet look is long, flowing hair perfectly waved to the side. I’ve never figured it out and always gave myself “mom hair” (no offense to moms), you know, random curls that look like bad homecoming ‘do’s? Curls have never been in my favor and my natural waves make me look somewhat homeless, or like a just released inmate.

The trick to this style is setting the curls, and FINGER STYLING. I never knew about finger styling until recently, and it’s changed everything. To get this trick at home, follow along!

Products needed:

Leonor Greyl Mousse
http://amzn.to/1gTse60

Alterna Caviar CC CREAM FOR YOUR HAIR!!
http://amzn.to/1mXsXL0

1″ wand (I typed wang 3 times on accident)
http://amzn.to/NW9jz6 – The same one I have

Elnett Hairspray
http://amzn.to/1q9Gtdx

Wide tooth comb
http://amzn.to/1ic2keM

The famous Mason Pearson: INDULGE! http://amzn.to/1nfXv7m

My Experience with At-Home Exfoliation and Chemical Peels

Ever since I had my first experience with Chemical Exfoliation I’ve been hooked. I’ve taken it upon myself to become educated in skincare, specifically with AHA/BHA and Peptides. There are really amazing things out there that work and the first thing I look at on skincare labels is the Ingredient List.

Here’s a quick little background on different exfoliators:

AHA (Alpha Hydroxy Acid): Alpha hydroxy acids are a group of natural acids found in foods. Alpha hydroxy acids include citric acid (found in citrus fruits), glycolic acid (found in sugar cane), lactic acid(found in sour milk), malic acid (found in apples), tartaric acid (found in grapes), and others. Alpha hydroxy acids seem to work by removing the top layers of dead skin cells. They can also increase the thickness of deeper layers of skin, promoting firmness.

via WebMD

BHA (Beta Hydroxy Acid):

There is only one beta hydroxy acid – salicylic acid.Beta hydroxy acid works mainly as an exfoliant. It causes the cells of the epidermis to become “unglued” allowing the dead skin cells to slough off, making room for regrowth of new skin. Beta hydroxy acid is reported to improve wrinkling, roughness, and mottled pigmentation of photodamaged skin after at least 6 months of daily application.

The difference you need to know:

The main difference between alpha hydroxy acids and beta hydroxy acid is their lipid (oil) solubility. Alpha hydroxy acids are water soluble only, while beta hydroxy acid is lipid (oil) soluble. This means that beta hydroxy acid is able to penetrate into the pore which contains sebum and exfoliate the dead skin cells that are built up inside the pore. Because of this difference in properties, beta hydroxy acid is better used on oily skin with blackheads and whiteheads. Alpha hydroxy acids are better used on thickened, sun-damaged skin where breakouts are not a problem.

via dermatology.about.com

Glycolic Acid:

Due to its excellent capability to penetrate skin, glycolic acid finds applications in skin care products, most often as a chemical peel performed by a dermatologist, plastic surgeon or licensed aesthetician in concentrations of 20 to 70% or at-home kits in lower concentrations between 10 and 20%. In addition to concentration, pH also plays a large part in determining the potency of glycolic acid in solution. Physician-strength peels can have a pH as low as 0.6 (strong enough to completely keratolyze the epidermis), while acidities for home peels can be as high as 2.5.[9] Glycolic acid is used to improve the skin’s appearance and texture. It may reduce wrinklesacne scarringhyperpigmentation and improve many other skin conditions, including actinic keratosishyperkeratosis, and seborrheic keratosis. Once applied, glycolic acid reacts with the upper layer of the epidermis, weakening the binding properties of the lipids that hold the dead skin cells together. This allows the stratum corneum to beexfoliated, exposing live skin cells. Highly purified grades of glycolic acid are commercially available for personal care applications.

via Wikipedia

Now that you are basically an esthetician, here’s my thoughts on my at home 40% glycolic peel!

Warning: I’m not responsible for you hurting yourself with this stuff- if you purchase it read the directions and always do a patch test.

IT’S AMAZING. It’s only to be used every 3 weeks but I’ve been finding little uses for it as well. I started by applying rubbing alcohol all over my face (this was totally terrifying) and letting it air dry. Afterwards I performed a small patch test on my jawline using the acid on a thick Shiseido cotton pad. I left it on for about 90 seconds and while I got a bit red and tingly it didn’t burn. I went ahead and applied the acid all over my face, neck and décolleté and turned on the timer. It said to leave on 3-10 minutes. Even though I’m a bit of a daredevil I set it for 3 minutes. The instructions said to have baking soda in water to restore pH. I didn’t have baking soda (I always buy it and I never know what I do with it?!), so I used my organic coconut oil since it has a pure pH. I had distilled water and a washcloth on standby.

Holy crap this burned so bad. I had my hairdryer on my face on the cool setting the entire time. I first felt it burning around my nasal fold and I should have removed it then as thats where I always get dry patches- it’s just a weird part of my face. I left it on for the entire time breathing lamaze-like. As soon as that timer went off i had that cold wet washcloth on my face. This made it burn even more!! Apparently that is what happens. As soon as I was sure I had the acid off I had my organic coconut oil on. It was immediately soothing. My face looked insane.. (see pics) but the next day the redness had subsided yet I did have exposed skin in my nasal fold from burning it.

2014-02-03 01.11.45 2014-02-03 01.12.11 2014-02-03 01.54.47

I did not pick anything over the course of the next few days. My skin was very dry and felt almost velvety although it looked alright with makeup. By the 5th day my skin was perfection. My dark spots were gone, I didn’t have a single blemish and I was inspired to tell you guys the tale. Everything I used is listed below, exactly where I ordered it from.

NARS Multiaction Hydrating Toner, or Shiseido Eudermine (http://amzn.to/1eQwfuZ)
Kate Somerville Exfolikate (http://amzn.to/1m8ACpa)
Dr. Dennis Gross Alpha Beta Peels for face (http://amzn.to/1eQvvGr)
Dr. Dennis Gross Alpha Beta Smoothing Body Towels (http://amzn.to/LIkJVM)
Philosophy Microdelivery Peel (http://amzn.to/1jxYG33)
The PMD (Personal Microdermabrasion) (http://amzn.to/NCXmPl)
40% Glycolic Acid (http://amzn.to/1hcALG2)

Products to have on hand for treatment during after Chemical Peels:
Shiseido Cotton (http://amzn.to/1eHRNZp)
Organic Coconut Oil (doing a video on this product- it’s life changing) (http://amzn.to/1eUvNub)
Baking Soda
Distilled Water

Creme de La Mer (Contact me to order)

Step-by Step: At Home Facials!

I just gave myself the best at home facial. I’ve been working like crazy lately and although a big part of my job is to teach people to take care of their skin, the past couple weeks I’ve been so exhausted that I fell behind. Buying a ridiculously overpriced mirror that flips to a 10x magnification, I’ve kind of been dying to see my skin up close and personal! There are so many different types of facials you can do in the comfort of your home, but tonight I wanted to focus on 2 things- blackheads and detoxing. Here’s exactly what I used tonight:

1) First I removed makeup with a cleansing oil (MAC Cleanse Off).

2) I used my Clarisonic with Dior’s Purifying Cleansing Milk to retain my skin’s moisture while battling dirt and oil.

3) To exfoliate inside my pores I used a classic- Clinique Clarifying Lotion #4 on Shishedo cotton.

4) Another classic! Biore Strips (although they really didn’t do anything impressive)

5) I spent a good 25 minutes with my extractor and cotton soaked in the Clinique Toner from before leaving my face pretty red but blackhead-free! Because I was already feeling pampered, I used this opportunity to clean up my brows!

6) I applied Dior One Essential Serum to my face, neck and decollete. One Essential is an amazing product that boosts all your other skincare while detoxifying your skin from the environmental damage we encounter on a daily basis.

7) Since I did this facial at night, I chose one of my very favorite skincare products I own- Estee Lauder Advanced Night Repair. It’s a great detox that has given a noticeable improvement in my skin within the first week of using it.

8) Some nights I wash my face and use only Advanced Night Repair as it is very moisturizing, but tonight I opted for maximum moisture and followed with Creme de La Mer ‘The Moisturizing Lotion’

9) Since I have been sick all week my nose was chapped and horrible looking. I have tried everything I could think of and nothing was making a big difference until a coworker recommended pure Shea Butter from L’Occitane. I rubbed it on my nose, lips and under my eyebrows where they were red from tweezing.

10) After everything I did, I decided to take care of my hair while I was at it and used an incredible product from Phyto called ‘The Elixer’. The elixer is a once-a-week treatment that purifies your scalp (imagine a clarisonic for your scalp pores) which is often neglected by us all. I’m sleeping with the treatment on and I’ll shampoo it out in the morning.

All in all it’s pretty late in bed right now but I feel marvelous and can’t wait to see my skin in the morning!

Time for Beauty Sleep- Goodnight!

Making lipstick at home!

Have you ever considered making your own lipstick? I have! I hate when I need a specific color and can’t find anything close to what I’m looking for. It’s also sad when you find an amazing color that is limited edition (ahem… pink friday anyone??). After watching these videos from EnKore Makeup I think it would be so fun to make custom lipsticks for photoshoots and weddings. It would be awesome to be able to use a custom lipstick on a bride then let her take it with her for her big day! For the cost of buying all the lipsticks I want from LimeCrime I could have unlimited amounts of pastels and black! I can’t wait to experiment with different finishes, scents & flavors. What color would you make?